 Solution: Rice Krispie squares (or "cereal treats" - hopefully I'm not risking a lawsuit by using a trademarked/copyrighted name) - a solution to short cakes and many of life's other problems. Not only do they function as delicious cake implants (who doesn't like Rice Krispie Squares?), but they also provide a strong base for wood dowels that were inserted into the 8" layers to support the 6" layer on top.
Saturday 19 November 2011
What happens when a cake just doesn't measure up?
The test cake for the Liberty Arts Fabric birthday cake turned out really well - a firm texture that handled well when cut, but was also light and moist. However, it was a lot shorter than anticipated. This worried me as I wanted to make a tall cake, so I needed something to add height to the cake to compensate.
 Solution: Rice Krispie squares (or "cereal treats" - hopefully I'm not risking a lawsuit by using a trademarked/copyrighted name) - a solution to short cakes and many of life's other problems. Not only do they function as delicious cake implants (who doesn't like Rice Krispie Squares?), but they also provide a strong base for wood dowels that were inserted into the 8" layers to support the 6" layer on top.
Solution: Rice Krispie squares (or "cereal treats" - hopefully I'm not risking a lawsuit by using a trademarked/copyrighted name) - a solution to short cakes and many of life's other problems. Not only do they function as delicious cake implants (who doesn't like Rice Krispie Squares?), but they also provide a strong base for wood dowels that were inserted into the 8" layers to support the 6" layer on top.Liberty Art Fabrics Birthday Cake

I had the fortune and pleasure to be asked to make a birthday cake with two accompanying requests: in some way, incorporate Liberty Art Fabrics into the design, and avoid heavy flavours.
I didn't really know much about Liberty Art Fabrics when I started, so I immediately went to their website to look through their fabric patterns online. A folder of inspiration images was started, with a few that were finally picked out to inspire the colour and decoration of the cake.

Wednesday 19 October 2011
High-Heel Birthday Cake

First ever high-heel cake!
There's a whole load of tutorials already out there on the web on how to make a gumpaste high heel. However, to prove the point that the internet has too much space (and to use said space to its fullest extent), I'll run over how I did the one you see here.
Monday 5 September 2011
Blackberry Clafoutis
It's been a while since I've posted (for which I do apologize). And, it's now blackberry season, with a large, rambling blackberry vine behind our office blessing us with an abundance of fresh, luscious berries.

I've been through blackberry and feta salad... blackberry cake with cream cheese icing... blackberry liqueur... you get the picture. (Unfortunately, I did not take any).
And now, with a bunch of extra blackberries, I decided to try a clafoutis recipe from Williams-Sonoma. A clafoutis has a baked custard-like filling, usually with berries or cherries.
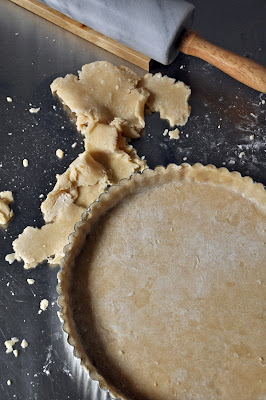
Now one thing that I have not figured out is if a crust is typical for a clafoutis. At the bakery I worked at, our clafoutis had a short biscuit-like crust. But a lot of recipes I've seen since are more like casseroles - baked directly in a dish and spooned out for serving.
I like having a crust, as a person who has an abnormal preference for crust (pizza, pie, etc). A crust provides a delicious counterpoint to the creamy filling and tart berries. It also makes serving easier, and I'm all about presentation.
And if you're making one tart, you might as well make a whole bunch of extra tartlets.
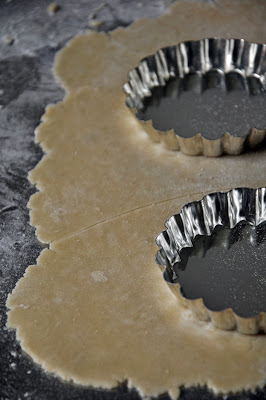
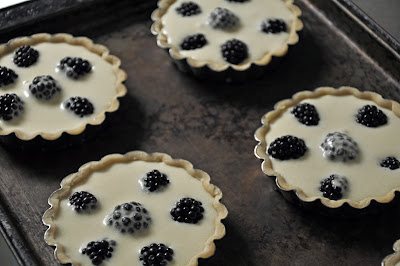
A clafoutis is quite simple. Once you have your tart shell (or not, depending), just lay out your berries. Choose your favourite, or any combination thereof. Frozen berries could be used just as well as fresh.

The filling is simply beaten eggs, sugar, vanilla extract, flour, and whipping cream. It's essentially a custard, but not cooked before baking. It's poured around the berries, almost to the top of the crust.
And through the magic of the internet...
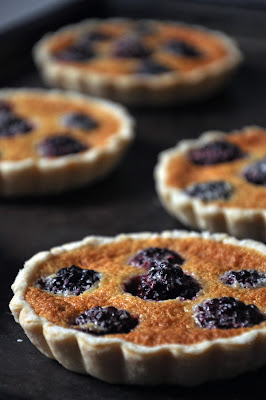
Enjoy! And I promise to post soon.

I've been through blackberry and feta salad... blackberry cake with cream cheese icing... blackberry liqueur... you get the picture. (Unfortunately, I did not take any).
And now, with a bunch of extra blackberries, I decided to try a clafoutis recipe from Williams-Sonoma. A clafoutis has a baked custard-like filling, usually with berries or cherries.
Now one thing that I have not figured out is if a crust is typical for a clafoutis. At the bakery I worked at, our clafoutis had a short biscuit-like crust. But a lot of recipes I've seen since are more like casseroles - baked directly in a dish and spooned out for serving.
I like having a crust, as a person who has an abnormal preference for crust (pizza, pie, etc). A crust provides a delicious counterpoint to the creamy filling and tart berries. It also makes serving easier, and I'm all about presentation.

And if you're making one tart, you might as well make a whole bunch of extra tartlets.

A clafoutis is quite simple. Once you have your tart shell (or not, depending), just lay out your berries. Choose your favourite, or any combination thereof. Frozen berries could be used just as well as fresh.

The filling is simply beaten eggs, sugar, vanilla extract, flour, and whipping cream. It's essentially a custard, but not cooked before baking. It's poured around the berries, almost to the top of the crust.

And through the magic of the internet...

Enjoy! And I promise to post soon.
Wednesday 6 April 2011

Sunday 27 March 2011
House Cooling

"Don't it always seem to go/ That you don't know what you've got/ 'Til it's gone."
Big Yellow Taxi, by Joni Mitchell
Thankfully, this isn't always the case. With friends, every time we get together, it's another reminder of the times we've spent together, how loved we make each other feel, and how much we value the impact that we had, and will have, on each others' lives.
Sunday 20 March 2011
Something strange...
Something very strange happened today...
... I won something on a draw today. This usually never happens to me; it's always the number that's 1 digit off, or the number I had for the last draw. Feelings of unluckiness may be universal human condition. After all, charity lotteries do have to make some money at the end the day.
But today, things were different. The wind must have been blowing off Lake Ontario in the opposite direction.
Kara Buntin writes a fantastic blog called A Cake to Remember VA, which has consistently offered fantastic insight on all aspects of running a cake business. Even more laudable is her consistency. While some bloggers may slack off for a month at a time and try to post a series of entries to compensate (none immediately come to mind) , Kara routinely updates every other day or every couple of days with a well thought-out post.
Thanks to Kara, I soon will be the owner of my first silicon food-grade mold. In anticipation, I've worked out the first cake I want to try it on.
Here's a sneak peek of what may be to come. Hopefully it will be up to par with Kara's work!

Friday 11 March 2011
Birthday Cake

So far, this is my 3rd covered cake, and marks the 1st anniversary since my first attempt (which coincidentally was a cake for the same friend's birthday). For this, I took inspiration from a flower detail she created as a fashion accessory, and then paired it with a pared-down, simple, white marshmallow-fondant covered cake.

 A quilted fondant band covers the bottom edge of the cake to add texture to the overall design. A small bead border joins the two together.
 The flower is rather simple and stylized to reflect the original inspiration for the cake. It is rather thick because MM Fondant was used rather than gumpaste.

 Something for everyone!
Sacher Torte

Not everything goes exactly as you plan.
It all started off with a new cake pan from Bulk Barn. I've been hankering for a 6" circular pan for a while. Not only does it make any cake instantly cute by its proportions, but as a single-dweller faced with the prospect of eating everything that he makes, it makes it easy to handle more baking. New recipe? No problem! No longer would I have to fear the issue of finding a herd of willing guinea pigs to consume my latest creation/failure.
The other reason why a 6" pan was so appealing was that I thought it could fit it into my toaster over. Adult Easy Bake oven, says you. But I figured that if I didn't have to fire up the big oven just for one cake, that would be a decent reduction in energy consumption. Everyone wins: Audric gets to bake a cake, and the rest of the world doesn't have to pay [as much] for it.
Sounds great? It certainly seemed so. The cake pan fits perfectly inside; its rim not even touching the top.
Until, that is, I realized that the toaster oven is really quite short. And that the heating element was really quite low. And one more fact I neglected: cakes RISE when baking.
Whoops.
 Whoops, indeed.
Thankfully, the smell of burning was just a superficial smell of burning. Just. Instead of being a perfect reduction of a regular oven, mine turned into the tanning-bed-from-hell-that-someone-accidentally-fell-asleep-in-at-full-supernova-power. (Disclaimer: I swear that I do not speak from experience.)
What initially looked like a pretty serious burn didn't actually penetrate into the cake itself, and was easily removed. What was left over was plenty of cake and a level top to work with.
 Cake layers, prepped for assembly!
Now that I've recounted the story of how I unceremoniously burnt my cake, let me know tell you affirmatively that the Sacher Torte is a truly dignified, elegant, refined cake. The cake itself is firm, fairly dense, fine-textured, and neither too sweet nor too moist. These layers are then lightly moistened with syrup and spread with nothing else than apricot jam.
 Ready for jamming!
 Just a thin layer to even out the sides
... and then it is coated with a smooth, glossy chocolate covering. Sophistication, in a cake. Discounting my piping abilities, that is.

The typical Sacher Torte has the word "Sacher" written over the top. Since my writing skills are less than optimal for the task, I decided to use my typical scroll pattern for the sides. It only seemed fitting for such a cake.
L'Opéra
 Impromptu change in decorations brought to you by: Audric not realizing he doesn't actually have the piping tip size that he thought he did!
There are classics in all genres of human expression: architecture, rock music, cars, movies. Timeless, dependable, universal, these provide a certain stability and structure to the rough-and-tumble course of our daily lives. You can always count on that trustworthy book or that one brand of shampoo to bring you through a rough spot.
One such classic in food is the combination of coffee and chocolate. In hot liquid form or in pastry form, it always provides an adjustable balance between sweet and bitter. One cuts through other, while the other mellows of the former.

In the case of the Opera cake, chocolate ganache and mocha buttercream are layered between almond joconde (sponge) cake layers soaked in coffee-flavoured syrup. The edges of the cake are left unmasked to show off the layers inside.
Less is definitely more, especially with a cake this rich. Go easy on the buttercream and ganache (I think I put a little too much); thinner layers definitely produces a far better experience when eating as all the flavours blend together.
Tuesday 1 February 2011
Key Lime Pie

It's been a while since my last wave of tart making, and I thought that it was time again to tackle pastry crusts again. They're still something I haven't gotten the hang of yet, which further prevents me from trying them. It's time to break the cycle!
For this, I tried a pâte sablée recipe from a Cordon Bleu technique book I read year or two ago. It was a recipe that has given me trouble in the past, and it decided to hassle me, yet again. I ended up having to add another egg yolk and some water to finally bring it together.
The recipe for the lime curd was derived Williams-Sonoma's recipe for Lemon Meringue Pie. Egg-thickened custards and curds have also been an personal struggle in the past. They never seemed to thicken enough before the egg overcooks. After the fuss with the tart pastry, I was determined to make this work.

Thankfully, the curd turned out perfectly. What I didn't account for in the past was the latent heat in the mixture, which thickened the curd even after being removed from the double boiler. The result? A silky-smooth curd, free from any graininess. After baking in the oven briefly, it had set perfectly in the tart shells.

And what better else to top it all off than with a mountain of meringue? I'm no good at swirling meringue, so I decided to try out a new piping tip instead. One lesson learned: when you're piling meringue this high, it pays off to do it in two passes: a small pile in the centre, and then a second outer coat that gives you an uninterrupted swirl straight to the top.
Saturday 22 January 2011
Orange, Almond, and Chocolate Chip Pancakes
 There's nothing like pancakes on a Saturday morning!
1 1/4 cups all-purpose flour
2 tbs sugar
2 tsp baking powder
3/4 tsp salt
1 egg
3 tbs almond oil
1 1/3 cup milk
Zest of two medium-sized oranges
Chocolate Chips
Directions:
- Stir together all the dried ingredients in a medium bowl.
- In a small bowl, beat egg and oil together. Stir in milk and orange zest.
- Pour the liquid mixture into the dry ingredients. Stir until combined, but do not overmix. There should be some lumps.
- Pour 1/2 cup of the batter onto a frying pan over medium heat.
- Drop chocolate chips onto the uncooked batter in the pan.
- When bubbles form and burst throughout the pancake, flip to cook the other side.
- Cook until underside is golden brown. Remove from pan; repeat steps 4-7.
Black Pepper, Sweet Basil and Cheddar Gougères

(Adapted from Good Housekeeping's Illustrated Cookbook)
Ingredients:
1 cup water
1/2 cup butter
1/4 tsp salt
1 cup flour
4 eggs
1 cup shredded cheddar cheese
Freshly-ground black pepper
Dried sweet basil
Paprika
Directions:
- Heat water, butter, and salt until boiling.
- Add flour at once.
- Stir constantly, over heat, until dough comes away from sides. Remove from heat.
- Add 4 eggs, one at a time, stirring between each until fully incorporated.
- Mix in 1 cup shredded cheddar cheese, freshly-ground black pepper, dried sweet basil, and paprika. Stir until combined.
- Spoon or pipe onto baking sheet. Bake @ 375°F for 50 minutes, or until golden.

Saturday 15 January 2011
Rumball Cake

Happy Holidays, and here's a toast to 2011!
I know this is slightly/very belated, but better late than never! Plus, there are still (checks calendar) 49 weeks left in 2011, so there's still plenty of time left for a little more goodwill.
Christmas is usually a much-anticipated holiday for me. I am the self-appointed Festive Decorator for my family, and I usually start sneaking up the cumbersome boxes of decorations from the basement at the end of November. I have established specific routines for the tree, trimming the dining room chandelier, and draping the banister with garlands. It is more the action of decorating, of preparing the house for Christmas, than the actual decorations that always got me into a festive mood.
This year was a sharp departure from that, working out-of-town until two days before Christmas. Even in University, the exam schedule was usually very fortunate to me and would sometimes allot close to a full month off for the holidays. The working world is far less kind, and I'll leave it at that. (I know that this also depends on the specific university and program. A hint: if you like vacations - and who doesn't? - the BLA program at Guelph is a good choice).
This year, I decided to attempt a Rumball Cake for the holidays. It has been a while since a rumball cake graced our family dining table. When I was younger, rumball cakes were almost exclusively reserved for Christmas or New Year's, and they were always a huge highlight of the night. I was eager to reintroduce it into our holidays.
It appears that there are three major categories of rumballs, each constituted of one major element held together with cocoa/chocolate, sugar, and rum. The first is finely-ground nuts, which I tried last year, with moderately-pleasing results. The second is wafers or cookies, ground into crumbs. The third is a brownie- or cake-like baked good, crumbled.
 Lost in a field of rumballs. (There are worst places to be.)
After much search for rumball recipes, I eventually settle on this recipe from Martha Stewart, which is the third type of rumball recipe. It yielded a very dense, very smooth-textured rumball that was very easy to handle and shape. The first trial batch were made with Grand Marnier instead of rum, which gave them a sharper taste than those made with rum. Both were just as delicious as the other.
The cake itself was chocolate genoise and dark chocolate ganache - two reliable standbys. The chocolate genoise was baked in a cookie sheet to yield a rectangle slab cake, which was then cut into quarter strips, each strip torted into two layers, and then re-stacked to produce two cakes each of four layers.
 Steps for ganache: Heat cream. Add chocolate. Stir until melted. Cool. Whip. Done!
The reason why I'm continually drawn towards genoise is its simplicity. There are only three major ingredients: eggs, sugar, and flour. The chocolate genoise has some cocoa powder substituted for the flour. There's an elegance to creating something with such a minimal number of ingredients.
 Sift the cocoa powder and flour together to mix the two together. This also removes and breaks down and clumps of cocoa powder.
 Mix the sugar and eggs together, and then heat over a pan of simmering water while beating constantly. When tripled in volume, remove from heat and continue beating until eggs fall in ribbons from the beaters.
 Fold the flour and cocoa into the eggs, 1/3 at a time. Spread the mixture in a parchment-lined cookie sheet, and bake until firm (springs back when pressed).
 Each section was torted into two layers. The parchment paper facilitates handling!
 Each layer is then soaked in rum syrup and layered with chocolate ganache. Given the thick consistency of the whipped ganache, this would have been a lot easier with a piping bag.
I decided to go with an acanthus-scroll decoration, running down the centre of the cake, flanked with rumballs on either side. Right before decorating, I had a minor concern that the proportions would cause the cake to end up resembling Lady Gaga's Minnie Mouse glasses, rather than the sophisticated vision I had in my head. Putting aside my doubts, I forged on and this turned out pretty well.
 The masked cake, ready for decorating. A small glass was used to mark out the rough guides for the acanthus-style decorations.
 The finished product! The rectangular form is conducive for rich cakes, as it easily allows for smaller individual servings. The only problem is finding an appropriate plate for presentation! (A glass cutting board was used for this, not the cookie sheet shown here).
Subscribe to:
Posts (Atom)